Pages

My grandsons and me

My grandsons and me
Grandsons are wonderful

Followers

Monday, October 8, 2012

.Monday, October 8, 2012

Well I had tried a ton of times to get this posting out but google just wasn't cooperating.  I have a Christmas card for you today that I made on World Card Making Day.  I was given a sketch and this is what I came up with.

I started out with a white card base which I made a gate card out of.   I then took a scrap of Stampin Up designer paper.  I then used the snow flurry die and ran it through the big shot.  I put crystals on each of the circles on the snowflake  I used Stampin Up More Merry Messages stamp set for the sentiment and the small die from the Stampin Up Apothocary dies to cut it out.  Awesome!


Enjoy
 
 
Pam

Friday, October 5, 2012

Friday, October 5, 2012

Hello Friday!  It has been a busy day today.  I don't know how I ever found time to work.  Going out to dinner with my friends so they are getting their boxes that I decorated for them with a few other goodies.

For today though I made another Christmas card.  I have all these dies and things that I have yet to use so I decided today would be a good day to get a die out and create a card around it.  This particular die was of a stocking.  It was much bigger than I thought but it fit fine on a 5X7 card which I rarely use.


I just happened to have some green premade card bases so I grabbed one of them and placed my stocking on it.  I die cut it out of red hologram paper so it shines and then I die cut the top, heel, and toe out of white card stock.  I found this fabulous corrugated sparkly paper and die cut snowflakes out and used dimensionals for a 3-D effect.  I used stickers for the HOHOHO, but you could put a child's name on instead.  

Have a great weekend and Enjoy!

Pam

Thursday, October 4, 2012

Thursday, October 4, 2012

Well, I thought I would be able to get things going a little earlier today but alas other things got in the way.  I finally had a little time to put together a holiday card.  I say holiday card because it could be used for any winter time card.

I used shimmer white for my card base.  I then die cut snowflakes using Stampin Up's Snow Flurry Die.  I cut out 3 large flakes.  Two of the snowflakes were cut from white card stock and one was cut from silver paper.  I cut one small snowflake in white.  I used dimensionals to space the snowflakes and turned each one slightly so that you can actually see each.  I placed a red crystal in the middle.  This card was very quick and easy and it is even prettier in real life.  

Enjoy


Pam

Wednesday, October 3, 2012

Wednesday, October 3, 2012

First of all I want to welcome Ashley Urban Edwards into the family.  My great nephew, Josh Edwards and Ashley got married last night.
They met 8 years ago on October 2nd so that is why they got married on a Tuesday night.  A very special day for them.  Wishing you two all the best.  

Now for the papercrafting stuff.  I decided it just might be time to start thinking about holiday cards.  I came up with this one although it could be used for something other than the holidays.  

I used Chocolate Chip for the card base.  I then took an embossing folder that is slanted stripes on white.  I found this adorable ribbon by Maya Road.  It made me think of gingerbread and hot chocolate. I used Stampin Up Scentsational Season stamp set for the mug and steam.  I used Stampin Up Joyous Celebrations stamp set to out line the sentiment.  The sentiment is from Sparkle and Sprinkle Nesties Ornament stamp set.  I finished the front of the card off with a red crystal for the sparkle.  I think it turned out quite nicely. I hope you do too.

Enjoy

Pam

Tuesday, October 2, 2012

Tuesday, October 2, 2012

I made another wedding card for my great nephew's wedding today.  I really am happy with this one.  I used white on white but wanted to add a splash of that purple so I used a die cut for a frame, then a die cut heart and I finally used an embossed E which I cut out.  Hope you like it and I hope that Josh and Ashley are happy with it as well.  Congratulations to them and may they have a long and happy marriage.


Enjoy

Pam

Monday, October 1, 2012

Well I have been working on special projects this last weekend.  I have three wonderful friends in Minnesota that I want to give a gift to when I head back to Florida.  A little something to remember me by, if you will.  So that is what I have been doing and that is why this post is going out so late.

I used boxes I got from Close to My Heart.  I then went through my paper stash, and found three that I liked.  Since the ladies are all different personalities I went for three totally different papers.  I then glued these on the boxes with Elmer's Glue.  And now for the bling.  I like bling.  I used crystals, brads and pearls.  I also put a flower on each one with a little bling in the middle of each.  Tomorrow I will be back to card making.

Enjoy

                                     Pam

Thursday, September 27, 2012

Thursday, September 27, 2012

Busy day for me.  I did my hospice visits and wow was I tired when I got home.  Who knew it was so much work visiting with people.  I guess it must be the thinking part that wears me out.

Since my great nephew is getting married next week, I thought I better get with the program make a card.  I haven't decided if this will be the card but I do think it turned out pretty nicely.
The brides color is purple so I used the kissing off method for the upper part of my background.  I then used 11/2inch ribbon in white and 1/8inch ribbon in purple and wrapped it around my background then mounted that onto the white card base.  I used Stampin Up Mixed Bouquet stamp set and the matching punch to make a purple flower.  I used the bird punch for the leaves.  I then stamped my sentiment on the bottom of the background from the Stampin Up Petite Pairs stamp set.

I use a lot of Stampin Up stamps on my cards mostly because I have a lot of them.  I also use their inks and papers because I guess I really started out with Stampin Up stamps a long time ago and I have always thought they are a quality product/

Wednesday, September 26, 2012

Wednesday, September 26, 2012

A little under the weather today but I did manage to dress and go to the movies with my friend Roxanne.  Seen that baseball movie with Clint Eastwood.  Don't remember the name but the movie was good.  I really have so much to do before I leave town in 2 weeks so I just have to get the ball moving.

Regardless,  I just had to get a post in.   I should be doing things in fall colors because Minnesota is so full of the red, yellow and oranges it is just beautiful, but I don't want to give up on summer colors just yet.  I don't necessarily think that the colors I chose are exclusively summer colors but the card is definitely bright and sunny.  I hope you like it.

I started with a white card base.  I then used Marina Mist and dry embossed that with funky squares.  I then took rectangles of White and Melon Mambo and rounded opposite corners on both.  I punched two 1" circles in Gumball Green and a scalloped circle in Midnight Muse and another circle in White that fit inside the scalloped circle.  I used a scrap of Gumball Green ribbon to use as two flags on the side of the White rectangle I have had so many things to be thankful for over this summer that I sure can use thank you cards and I really like how this one turned out.

Enjoy!

                                                        Pam

Tuesday, September 25, 2012

Tuesday, September 25, 2012

Happy Tuesday everyone,  I had such a great day, first I went golfing with friends Roxanne and Judie, then the three of us lunched at Chili's and chatted for over 2 hours.  So much to say and so little time.

But even before I went golfing, I created this card from a MOJO Monday card sketch.  I love how this card turned out.  What do you think?


I have some precut card stock so I wanted to use that for the card base.  It just happened to be Stampin Up's Gumball Green so I took out my Stampin Up color coach to see what colors would work well with Gumball Green.  I also wanted to use the new embossing folder that looks like wood.  I decided to use Close to Cocoa Ink and inked the embossing folder before I ran it through the big shot.  That is how I got the brown color in all the grooves.  I then used some Stampin Up designer paper that has little butterflies in the colors of Gumball Green, Marina Mist and Melon Mambo with a Midnight Muse background.  I used my Spellbinder's Nestibilities to cut the scalloped and plain circles.  I used round punches for the half circles on the top of the card.  I punched out a Boho flower in Marina Mist and leaves in Gumball Green and added a large pearl.  Oh by the way I did stamp on the ivory circle from Stampin Up stamp set Word Play.  

I really love this card.  The colors are awesome.  Who know the Color Coach could really work.  

Enjoy the rest of the day,


Pam


Monday, September 24, 2012

Monday, September 24, 2012

Well it has been a long time.  I spent a week in Florida with my cousin, Janet.  A Thelma and Louise trip without any murders or anything.  Had a great time too.  My adopted sister, Shirley and her wonderful husband, Dave, hosted a birthday bash for me.  Oh what fun and a big thank  you to everyone.

Last week, I worked solely on a wedding card box for one of my great nephews upcoming wedding.  Josh and Ashley will be saying their vows on October 2, 2012 so I wanted to be sure to finish it and get it over to my niece, Traci, this week.  Here is a picture of the box.

I was able to buy a box trio at Michael's and the I purchased one small box.  I then covered each piece with satin using fabric glue. I used ribbon and peals on the edges and the flowers were purchased at Michael's as well.  I also monogrammed the box with the letter E for their last name.  I found this beautiful rose flower in the bridal section of Michael's and it was for the hair or a pin.  I clipped off those pieces and glued it to the top of the small box.  This picture really does not do the box justice it is much prettier.


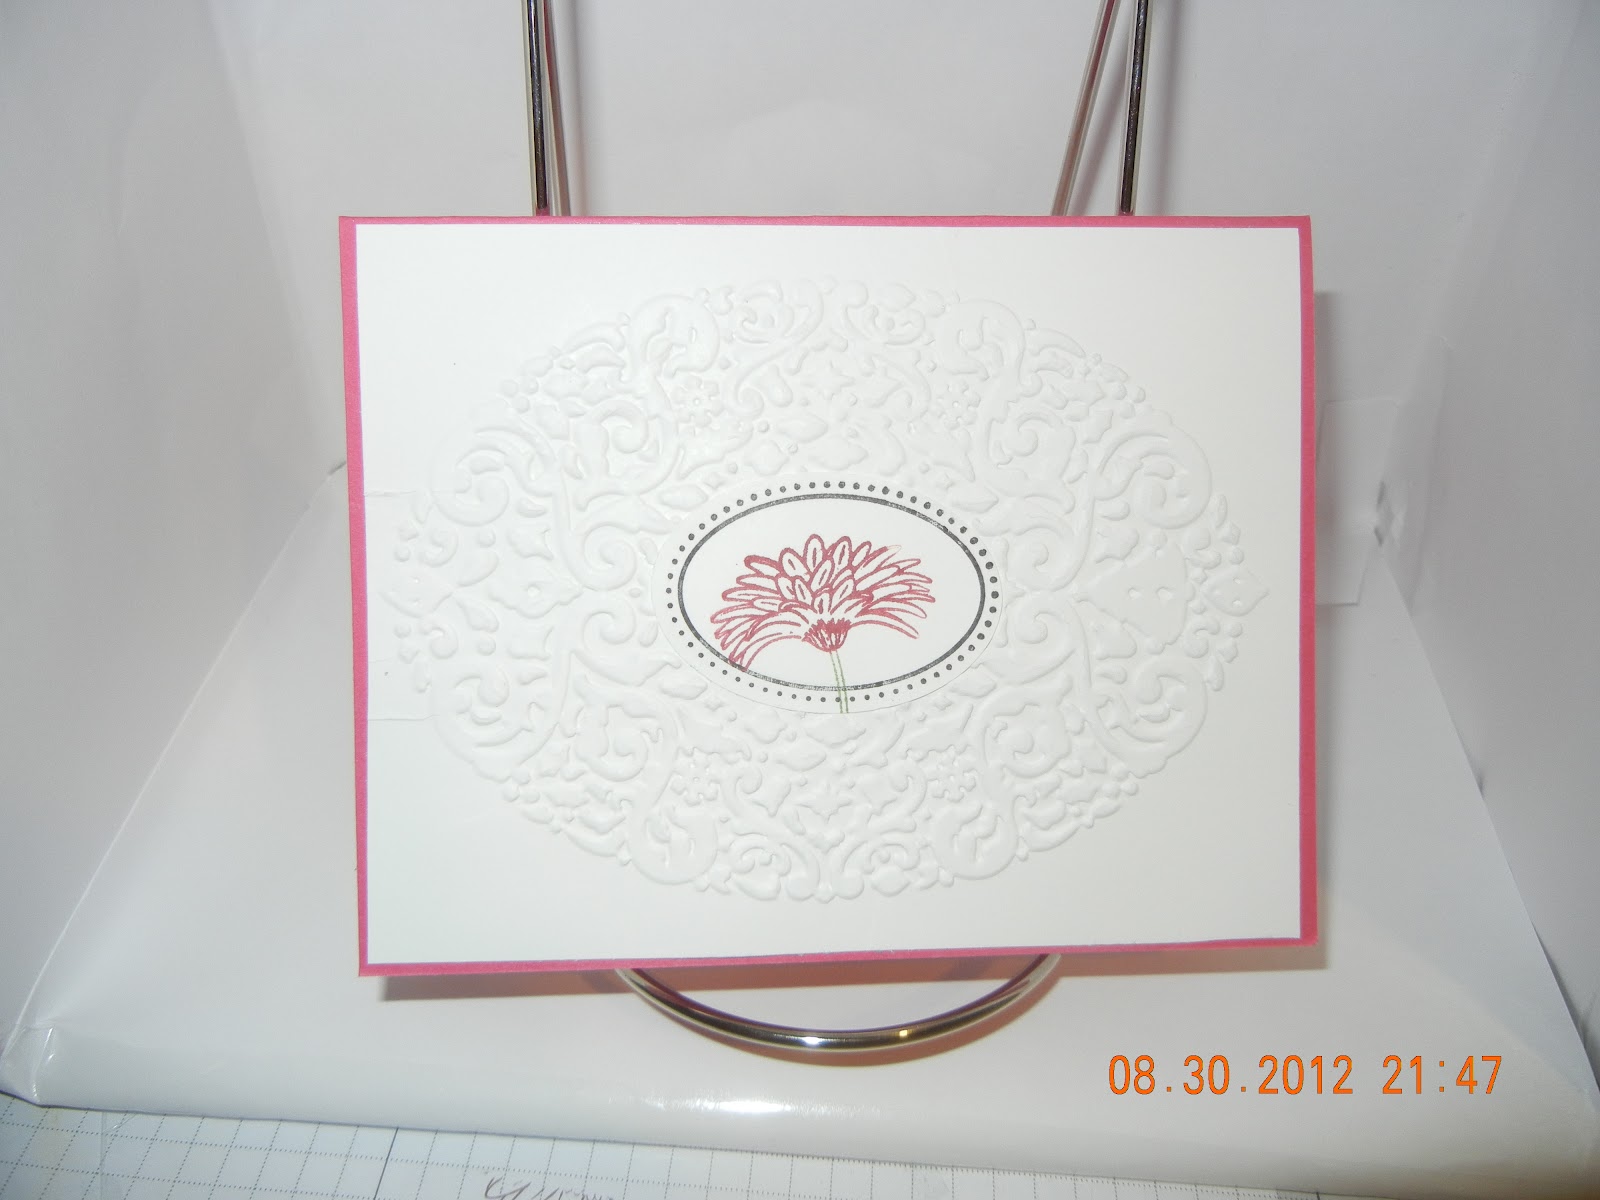
Saturday was my 28th Wedding Anniversary.  I made the card above for my wonderful husband, Dave.  I used nautical designer paper from Stampin Up and then stamped one of my favorite sayings on the front.  Dave really is the love of my heart and life.

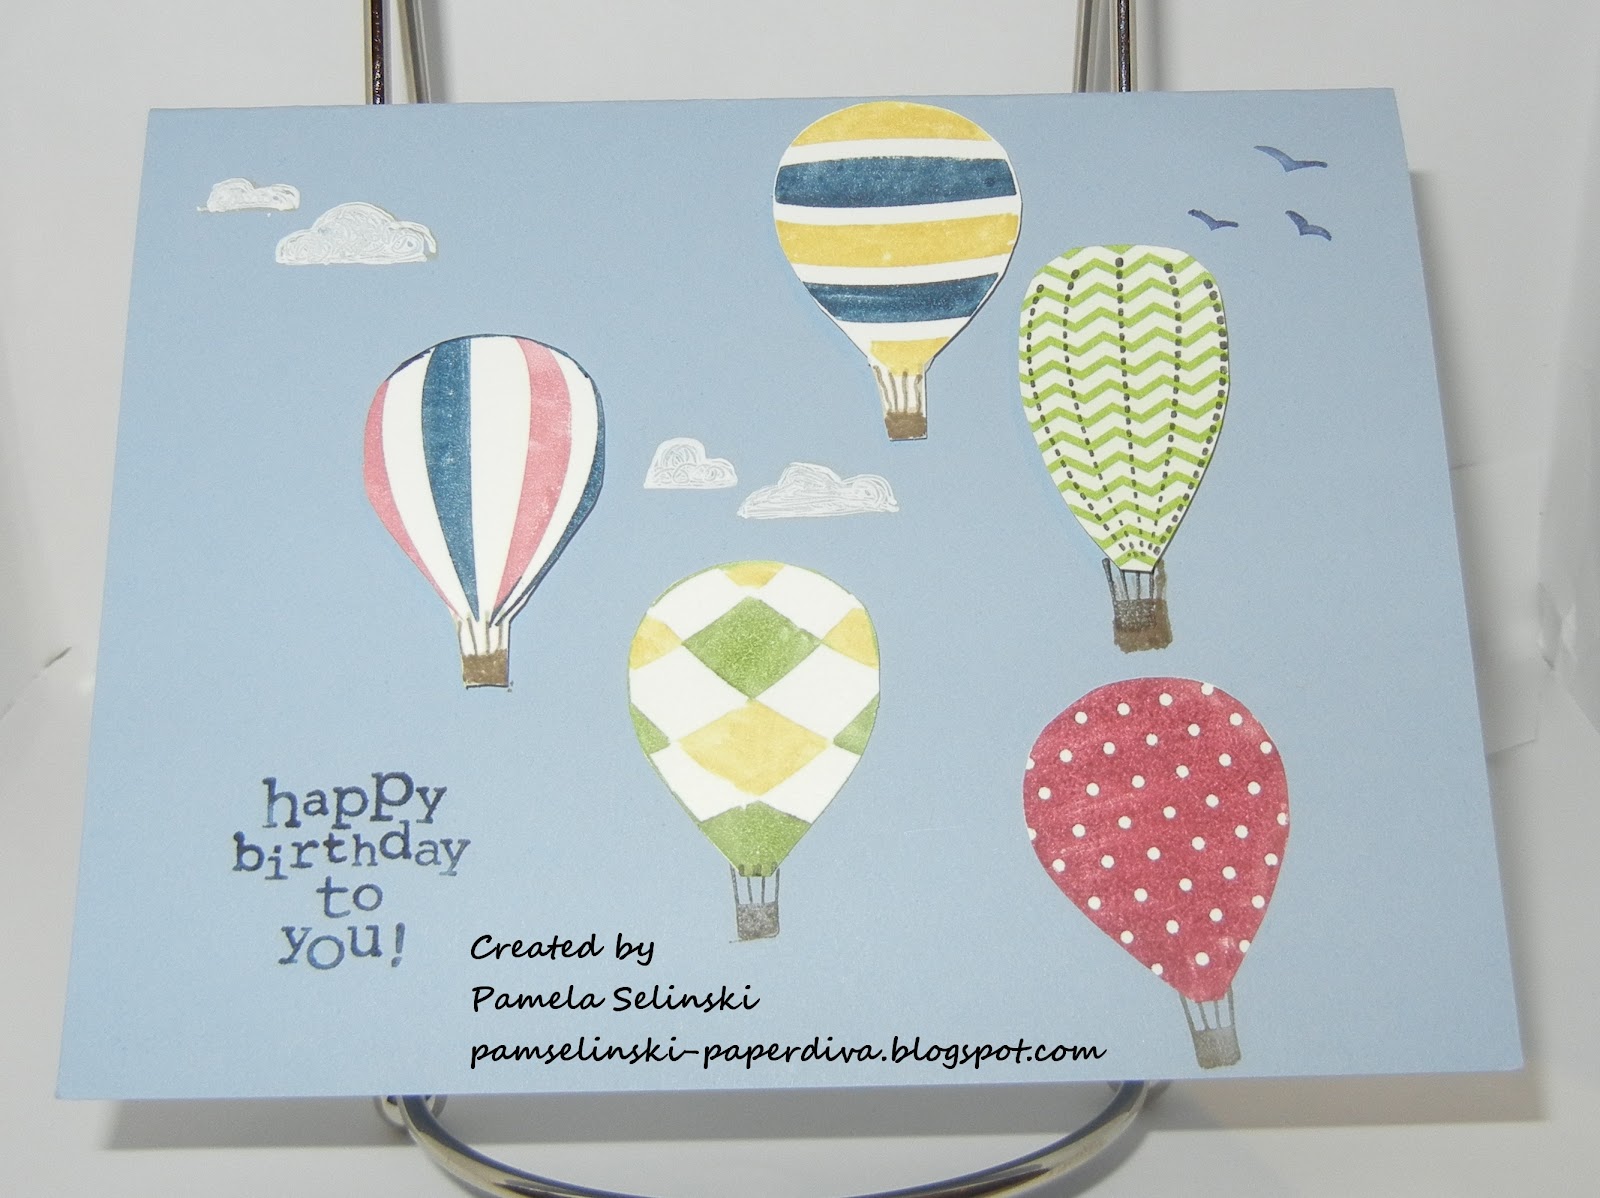
I made two alike cards but with different colors.  The one above was for my nephew in Texas and the other a belated birthday for my brother-in-law, Tom.  I used the Up, Up and Away stamp set from Stampin Up/


The last card I made this weekend was for my nephew Nik.  He turned 16 on Sunday.  I thought a card with a card on it might help him convince his folks he needs his own vehicle.  HAHA.  Anyway I hope you enjoy.


Until Tomorrow,


Pam

Wednesday, September 5, 2012

Friday, September 7, 2012

I will be on vacation next week and don't know if I will be close to internet access for a daily blog.  I am hoping to post a few blogs though.

Here is my final Halloween card I think.  I think there is more to the fall then just Halloween so I would like to focus on a few of those kind of cards.  Anyway, this is one of my favorite stamps for Halloween.  Both of the stamps are from Northwoods Rubber Stamp, Inc.


No bones about it.  I giggle every time I see these two together.  I just stamped and mounted on grey card stock.  Well I added a couple of silly eyes to the middle skeleton.  He is the leader I think.  Yup I do like this card and it was easy peasy.


Enjoy


Pam


Thursday, September 6, 2012

Here is another simple card.  I used a background stamp and I wiggled it hoping that the letters would look like they were shaky.  The stamp is from a company called The Last Word (in rubber stamps). The ghost stamp is from a company called Stamp A Lot.  I dusted the background with a Stampin Up ink called Summer Starfruit.  It is a yellowish green color which lended a scary background.


I think it turned out quite cute.  I did use dimensionals to pop up the ghost and mounted the entire thing onto grey card stock.

Enjoy

Pam

Wednesday, September 5, 2012

Hi there!  Well it is that time of year when school is starting and along with that the leaves are changing color and starting to fall.  Next month is Halloween so I decided to start making up some fall cards including Halloween.  But before that, I made another gift card holder but for a baby.  I just want to show you that you can make the same design but with different paper and embellishments you get a different look entirely.

There is no glitz to this card.   I used buttons that are plain and simple and of course the paper I used is definitely not sophisticated but it is very cute.  

And now for the first of many Halloween cards. 
The stamp I used is from Northwoods Rubber Stamps, Inc.  I love the cats in this card, they are just waiting to get in trouble.  After I stamped, I colored the moon, then masked it so that I could brush on grey and purple ink all over the white card stock.  I then used small crystals for their eyes.  I mounted the entire thing on grey card stock.  This card was one dimensional so that made it fast and easy to do.  Using a large stamp can afford you the ability to complete cards quickly and then you can have fun with the embellishments.


Pam

Tuesday, September 4, 2012

Hello everyone.  Hope everyone had a wonderful Labor Day weekend.  Since Monday was a holiday I didn't blog.  In fact, I didn't work on cards.  I really should and tomorrow I will have a Halloween card for you.  I did do a drawing for the beautiful stamp set from Stampin Up called Reason to Smile.  The lucky winner is Karon Hughes.  Karon please send me your mailing address to pamselinski@comcast.net so I can get your stamp set mailed off to you.  Twyla and Katy, the others that commented will also be getting a gift because I appreciate your comments.

Please let your friends know about my blog because there will be other prizes in the near future.  I have scrapbooks, paper, stamps and other paper craft things to give away.  The contests are not difficult and will generally just require you to leave a comment and check back regularly.  If you don't check back you may miss out on a fabulous prize or at minimum a fabulous idea for your paper crafting.

Have a great day.

Pam

Friday, August 31, 2012

Friday, August 31, 2012

Nothing exciting today.  Our youngest grandson, Cohen, was visiting us today.  He is 19 months old and a real whirling dervish.  He is so funny and definitely makes us laugh.

Well I did come up with a new card for the Reason to Smile stamp set and I am hoping you like it.  I sure did.  Sometimes I amaze myself LOL.


I used the solid flower from the set and stamped it on white card stock using Stampin Up Basic Black. This is one of the new ink pads and if you use it be sure that you let the ink dry well.  It takes a little longer to dry and it will smudge if it is not dry.  I then took a scrap of black ribbon and bound it around the lower 1/3 of the white card stock and then adhered the white cardstock to a designer paper from a 6x6 paper pad called Victoria Gardens by Echo Park Paper Co.  I then mounted the entire thing onto white card stock.  And for just a little color, I added a punched Red Rose flower oval.  Actually I made 3 yesterday because I had something else in mind when I started but then changed my mind and so I had one to use on today's card.  Like I said some days I amaze myself.

Remember you need to leave a comment about any of the cards this week to be entered into a drawing for a Reason to Smile stamp set.  I will even send you a new set and not the one that I have been using.

Have a great Labor Day Weekend.

Pam

Thursday, August 30, 2012

Thursday, August 30, 2012

Well another exciting day for me.  Went to the physical therapist and got a wonderful massage and stretch.  Then I went to the pool to test out my water socket.  Well the leg didn't stay on.  It was okay while I was in the pool but I couldn't keep it on once the liner got wet.  I got a wheelchair ride to the car and once I got home Dave helped me.  I was going upstairs to shower and the leg totally fell off.  Oh my goodness it was so funny.  I wish I had a picture to show you.

What I do have a picture of is a new card that I made from the Reason to Smile set.  As I promised I am making a different card from the set all week because I have a set just like it up for grabs.


I am posting two pictures because I wanted you to be able to really see the embossing.  I guess I need to take a photo taking class.  Anyway, I first stamped the flower with Rose Red and Wild Wasabi ink.  I then stamped the oval outline from the Stampin Up Joyous Celebrations stamp set.  Then I punched it out with the large oval punch.  The next step was to emboss the mat with the Textured Impressions embossing folder from Stampin Up.  I then adhered the punched oval in the center and adhered the mat to the card and I was done. 

I love flowers so this is one of my favorite stamping sets.  Until tomorrow.  Have a great evening.


Pam

Wednesday, August 29, 2012

Wednesday, August 29,2012

Another beautiful Minnesota day.  I was busy busy today and so I am a little late getting this out but I sure had fun making another card out of the Reason to Smile stamp set from Stampin Up that I have up for grabs this week.  All you have to do is leave a comment.  I will make a card using the stamps from this set all week.

I tried this technique of spraying shimmer sprays on white card stock using red yellow and orange with a little pearl thrown in the mix.  After the paper dried, I stamped the single out line flower from the Reason to Smile set, using Memento Rich Cocoa ink.  I then stamped a piece of card stock and colored the flower with Stampin Up markers, Summer Sun, Dusty Durango, and Early Espresso.  I also colored the flowers I stamped with Dusty Durango and Early Espresso.  I then mounted the single flower with pop up dots.  I then mounted the flower paper onto Stampin Up designer paper Old Olive from the Polka Dot Parade set.  I then mounted the entire thing onto white card stock.  I really like the way this turned out.  Making the one background was no more time consuming then sponging a variety of colors onto card stock.  It reminds me so much of the colors of autumn.  I did fussy cut the one flower though.   Hope you enjoy.


I then wanted to share a card I made for my great nephews wedding in October.  I found this leaf ribbon in a lavender color so I put that onto a white opaque ribbon.  I then made a flower from Stampin Up Mixed Blossoms by white embossing on white cardstock.  I really like the white on white.  I stamped the sentiment in lavender as well and then die cut it and adhered with adhesive to the dotted background paper and then that onto the card base.  Just a little variation of the white on white that I really love.   Enjoy and don't forget to leave a comment

Tuesday, August 28, 2012

Tuesday, August 28, 2012

Hello everyone,  I have a fabulous card for you today.  My niece, Michelle Selinski turned 21 years old this month which called for a special 21st birthday card.  Actually, it came together quickly and I have to say Paper Crafts Magazines "Card Design Handbook" is awesome.  It really helped me rethink the original card that I made.


Originally I used just the designer paper which really was not all that fun and interesting.  Actually it made my eyes go a little crazy.  Using concepts that I read about in Card Design Handbook I used the asymmetrical design and added two solid colors that toned down the designer paper.  The solids are colors that are in the dp also.  I stamped two balloons then stamped them onto white cardstock and used sticker numbers The happy birthday banner was made using Stampin Up set Itty Bitty Banners and the die cuts that coordinate with this set.  Happy Birthday again Michelle and I hope all of you enjoy the card.

Also don't forget to check Mondays blog for the contest!!!!!!!!!!!!


Pam

Monday, August 27, 2012

Monday, August 27, 2012

Well hello everyone.  I wasn't feeling especially well so I didn't post a couple days last week so I decided to show you two cards that I made.  I also promised you contest.  Well it isn't really a contest because all you need to do is leave me a comment about one of todays cards and on Monday, September 3, 2012, I will randomly draw a winner from the comments I receive and the winner will receive the following Stampin Up stamp set. 

This is a beautiful set of stamps and can be used for cards or for scrapbooking.  And because I would be remiss not to give you an example card, the following card was made with my set of  "Reason to Smile.

So I used Primrose Petals card stock for the card base.  I then used a scrap of Twitterpated designer paper leaving just a sliver of primrose petals on the bottom.  I used a piece of 1/4 inch stitched grosgrain ribbon in Wild Wasabi at the top of the designer paper.  I stamped one of the flowers from the Reason to Smile stamp set on a scrap of white and cut it out with one of the Apothecary Accents dies.  I sponged around the edges of the white with Blushing Bride ink.  I then slipped the flower piece under the Wild Wasabi.  I used a stamp from the Teeny Tiny Wishes set for the sentiment.  I made this card in under 15 minutes without a prethought out idea. 

Making cards is not only a relaxing hobby but is so easy.  If you haven't tried stamping and making your own cards you must give it a try.  You will fall in love with it just as I did.

Now I have been making cards and I made a gift card holder.  I CASed a card from pinterest so of course because I was CASing I changed the colors and closure.  This card turned out awesome.  The only thing I would change would be something to secure the bow.  Take a look and see what you think.
I used white card stock for the base.  I then found a scrap of designer paper from Stampin Up's Bella Bleu.  I used the same designer paper for the bottom and top of the faux box.  I used designer paper and brown card stock cut with the medium and small oval punches and adhered to the back of the box top for the bow.  I used velcro for the closure but used a sparkle button and a pearl for my faux closurel.  I added a tag with the sentiment Mr & Mrs from Stampin Up's Tiny Tags and secured it to the card with linen thread.  Pull open the box lid and there is a place for gift card and I wrote congratulations on the card.  I was really happy how this turned out.  Like I said the bow was a little insecure and when I make another, and I will, I would put a piece of card stock over the lower portion of the box top to secure the bow.

Now remember you have a week to leave me comments and let me know what you think of my cards.  Pretty easy task to win a wonderful stamp set.
 

Wednesday, August 22, 2012

Wednesday, August 22, 2012

Well today has been slow down day.  I didn't really didn't do much of anything. I did sign up for a class tomorrow to make the beautiful ornament that is on the front of the Stampin Up Not So Mini Catalog.  I had to stamp and cut out 20 of each of 2 ornaments.  I decided since I was taking on that task I would just stamp and cut a few extra ornaments out to make a Christmas card. 


I used very vanilla for the card base and the new Candlelight Christmas Specialty Designer Paper as a mat to use the cherry cobbler scalloped tulle ribbon, which I gathered together and tied with linen thread.  I then placed an old olive stamped ornament on top of that.  I used a scrap of green ribbon around the top of the ornament.  I have to say I like how it turned out and hope that you do too.
 
Starting Monday, August 27, 2012 at noon, I am starting a new contest.  That is all I am saying for now except that the prize will be an entire stamp set.
 
Enjoy,
 
 
Pam

Tuesday, August 21, 2012

Tuesday, August 21, 2012

Well I realize this is being posted rather late but I have been gone all day.  I had the best time today with my friends Jeanne and Judy.  We went to St. Cloud, MN to a store called Crafter's Direct.  Wow what a wonderland of fun.  We then went to lunch at a place called Grizzley's and then to the most beautiful place called Clemons Munsinger Gardens.  This place is so totally amazing.  It runs along the Mississippi river.  The gardens are filled with amazing flowers and trees.  There are benches to sit on and enjoy the beauty of the place.  The garden was created by the Munsinger's for everyone to enjoy.  There is no charge to go through the beautiful gardens so if you are ever in the area make these gardens a place to go.  I could have sat there all day amongst the flowers.  Speaking of flowers, I want to share one of my latest cards.  It is a card I made for my friend Donna Sobraske's birthday.  I used the Stampin Up set World Treasures. 
I used Dawn Olchefske's triple time design and basic grey and melon mambo.  Found a scrap of black, grey and white ribbon and that is it.


Enjoy until tomorrow.


Pam


Monday, August 20, 2012

Monday, August 20, 2012

My goodness the summer is going fast.  Last week at the Wisconsin Dells with most of our family ( really missed having son Brian with us) was great.  I love my grandsons so much and having them around everyday was nice but now it is time to get back to the everyday life.  The two oldest must start getting ready for school and the littlest one must start to get ready to return to daycare full time.  They grow so fast, it is nice to get pictures of them every year so I can watch how they grow.  While we are at the Dells each year we celebrate middle grandson, Blake's, birthday.  He turned 12 this year and we did the usual, taco's, presents and ice cream cake.  He is a wonderful kid as they all are.  Here is the birthday card I made for Blake.


I belong to a card club at DOstamping and she sends out the materials and patterns each month for like $24.  One of the cards had a race car from a newer Stampin Up set that I do not have.  I do have an old set called Toy Box that no longer is for sale.  I do however like the set because it has so many options for children cards.  I used the race car from the Toy Box set and made the middle portion of the card.  I then used the new Stampin Up set called Itty Bitty Banners and stamped the happy birthday on a scrap piece of white paper and used the matching dies to cut the banner out.  I then assembled the card the way that Dawn had created it.  She used the zigzag embossing folder for the black, then all three pieces were adhered to a black card base.  I used a sentiment on the inside that said "can't think of a nicer person to celebrate."  Hope you enjoy and have a great rest of Monday.


Pam

Saturday, August 11, 2012

Next week

 I am on vacation next week and will be computerless and stampless.  I know it is awful.  Well not really as I get to spend time with all my grandkids.  Yeah.  I will be posting again the following week Until then have a fabulous week.


Pam

Thursday, August 9, 2012

Thursday, August 9, 2012

I have been gone all day baking.  My husband, Dave and I get together with our good friends, Chris and Kim Capaul and bake coffee cake.  Well Kim and I have the hard part, rolling out the dough, while the guys just make the stuff.  We go  out to lunch and then sit around chatting and laughing while the coffee cake bakes.  This is usually a winter tradition but every other year we make the coffee cake for Dave's family reunion.  Needless to say, no time for stamping but not to fret as I made a couple of cards one day and held this one back.  I made this from the flower in the Stampin Up set World Treasures.  Really do like this set.  I did this card in the triple time technique which I have to say is my all time favorite card style.

Enjoy


Pam

Wednesday, August 8, 2012

Wednesday, August 8, 2012

Well today I am going to share with you a card that I made from a stamp set that I fell in love with, Stampin Up set World Treasures.  I held off buying it wondering if I would really use it that much but I finally caved and I am so glad that I did.  I just got the set and have made two cards and have a couple other ideas. 

I love this peacock.  I used bermuda bay for the card base.  I then decided some of the new designer paper, International Bazaar was called for.  I stamped the peacock using the Bermuda Bay and then fussy cut it out.  I used dimensionals to pop it up off the card.  I used yellow gold crystals to add some more dimension.  I used Stampin Ups Friendly Phrases and the Bermuda Bay ink for the sentiment.  I did dig into my ribbon stash and found a scrap of Cajun Craze and it worked out perfectly.  Hope you enjoy the card as much as I do.  I think this just may be one of my most favorite card yet.  Oh who am I fooling, I love them all.  Have a great day.

Pam

Tuesday, August 7, 2012

Contest winners

Congratulations to both Nicki and Barb.  They have claimed their prizes.  Thanks to all of you that are now following my blog.  Make sure that you check it often because I will be having other contests.  I am downsizing and have so much stuff in my stash that I could give a prize a week away for probably 5 years and still have stuff that I am not going to use.   That is what happens when you get carried away.  I actually was a Creative Memories consultant and then I had an accident at work and lost my leg and lets just say recovery is lengthy and my business fell apart.  At any rate I have lots of things to use for prizes. 

Now I didn't do a post on Monday because I thought I published the one that ended up on Sunday late enough to be Mondays.  My grandson, Cohen, who is an active 18 month old was here with me this morning and he likes to be outside and he is like a ping pong ball; you have to watch him every second.  But I did make a card last night from a new set that I just received from Sparkle N Sprinkle.  I got two sets and the one I used 246 Hat Ladies is so funny.  I like a little humor in my cards so when I got these I just had to use the set right away.


Two ladies out on the town and having Fun after Fifty.  I think I should change up the sentiment and stamp it in red.  The yellow doesn't show up well.  Anyway, I used dp from Gina K Designs and a scrap red ribbon.  I used an ivory card base and placed the dp on top of that making sure that the ribbon hide the seam where the two colors met.  I then stamped the focal image in black and colored in using Stampin Up markers.  I then punched the corners with ticket punch from Stampin Up.  The image and sentiment both came from that same fun set from Sparkle N Sprinkle.  I love the card, I can use as a birthday card, thinking of you card, or just a note card.  So many ideas bouncing around in my head.  The stamp set has three other images and 4 additional sentiments so it is quite a large set for the price.  I can't wait until I have time to make another card but right now I am going to take a nap.  I am tired after such a busy morning.  Enjoy ladies. 

Pam 

Monday, August 6, 2012

CPC14 Pretty Cards

Hope everyone had a wonderful weekend.  Saturday, I went to a family fest in Maple Grove with my daughter, Katy and my grandson, Cohen and then I went to their house and helped Katy with some last minute baby shower preparations for the shower she was giving for her friend Jenny.  We took my mother-in-law and her friend to a polka mass in Isanti, MN on Sunday.  My sister-in-law, Donna and her family live there.  The church had a festival too so we ate and played bingo.  Then my sister came to visit for a while and returned some stamps that I had given her.  It seems that we all are downsizing these days.  Unfortunately, I went through those she returned and returned a few to my shelf.  Only a few though.  I still have plenty to sell off.  They are still great stamps I just can't keep all of them if I want new.  I do like new. There are so many beautiful stamps out there.  Then my daughter, Jennifer stopped by and needed some sympathy cards.  Anyway, I didn't have a lot of time this weekend to work on cards.  Well I did manage to make a few.  The one that I am showing today is for a challenge on CraftProjectCentral. CPC14 Creating Pretty Cards provided a sketch

And here is my interpretation.  Since I am a flower person I decided to go into my stash of stamps and found a wonderful Stampin Up set called Punch Potpourri.  I used two of the new in-colors from Stampin Up called Primrose Petals and Raspberry Ripple.  I stamped the flowers in Raspberry Ripple and punched them out.  I then punched out three 1 3/4 inch circles in the Raspberry Ripple.  I used the Primrose Petals as a mat and some of the Primrose Petals ribbon.  I also stamped on Very Vanilla the sentiment from another Stampin Up set called You're a Gem.  I added some of the tiny pearls to finish it off.


I do have to say that this is a very Pretty card and I am very proud of it. Enjoy my interpretation of the card and have a great day.


Pam

Friday, August 3, 2012

Contest Winners

So I am a little late but only because I was waiting for my hubby. He was in the shower and then didn't come upstairs right away.  Anyway, without further chatter:

The first name drawn is

Nicki Newman

The second name drawn is

Barb Bruder

Congratulations Ladies and thanks so much for following my blog.


 Remember:   Winners will have until Monday at 8:00 p.m. (CST) August 6, 2012 to send me your information via email at pamselinski@comcast.net.

One note if a winner does not respond by the aforementioned day and time, a new winner will be chosen. 


Now ladies, those of you that didn't win don't dispair because I am already planning another contest.  Yup that is right.  I am downsizing and have tons of new products that I would love to share with you so watch for the next contest coming soon.

Pam

Friday August 2, 2012

Happy Friday everyone.  I have found the ideal technique.  You can use it for just about anything.  I love it.  I seen it on a Stampin Up blog http://dostamping.typepad.com/ recently and it just looks great no matter what subject you use.  Today I made a birthday card and a Christmas card. 

I took a picture of both cards at once and then I took individual photos of each.  It looks like it would be difficult and takes tons of time but it doesn't. First of all you cut all your pieces: white or ivory 2X3 1/4, 3X 4 1/4, and 4X5 1/4. Then your card base color.  In the first card I used Stampin Up new color Midnight Muse then cut two additional pieces (in this case, blue) 2 1/4X3 1/2, and 3 1/4X4 1/2.   Set the base card and last two cuts aside.  With the white cuts place a small dab of tape on the back of the small piece and center it on the medium piece then place a dab of tape on the back of the medium piece and center it on the largest white piece.  Then stamp away.  Once it is stamped take the pieces apart and mount each on it's corresponding color piece.  


On the first one I wanted to make a masculine card because I never seem to have enough of those. Using Stampin Up The Open Sea stamp set I stamped the compass all over the white pieces.  I mounted the largest piece to the card base and then I mounted the small piece to the medium piece remembering to match the tied red and white baker's twine around the medium piece and tied a happy birthday sentiment from Stampin Up's Teeny Tiny Wishes and then adhered the medium piece to the large piece and waala I was done.  I think it is a really rich looking card.
    

This card was made with a set from Sparkle N Sprinkle set 418.  I stamped the ornament in green and then used a red sparkle pen for the poinsettia.  In the center of the ornament I sponged a pale yellow.  I mounted the ivory card stock with green.  On this card I didn't use a ribbon or sentiment but liked it just the way it is.  I will put a sentiment on the inside. 


Now if you haven't joined this site remember to do so today before 8pm CST as that is when I will be closing the contest and having my wonderful husband Dave draw for the two prizes. 

Have a wonderful weekend.


Pam

Wednesday, August 1, 2012

SNSSC10 Thursday August 2, 2012

While going through my emails of which most are stamping blogs, I came across a challenge from Sparkle N Sprinkle.  The challenge was to make a card from a sketch they posted (if you are interested in the challenge, go to their blog) and also using their stamps.  Well since I am trying to figure out a Christmas card I decided to make christmas cards from the sketch.  I ended up with two cards but I am unsure which I should use for the challenge.  Well, the rules don't say that I can't enter more than one but I guess I like the ornament one best of the two.  Here is the card that I made using Sparkle N Sprinkle Stamp Set #418.  This set is great because not only does it have Spellbinder Nestibilities Dies that can cut out the ornament images, but it comes with many, many sentiments for the holidays.


I decided to use a non-traditional color for christmas with the blue.  After stamping and cutting out the ornaments, I took my Sakura clear star pen and high lighted the ornaments and the sentiment.  I used dimensionals to pop up each ornament and silver wire to hang the ornaments from.  The card was easy and quick to make so it would be a real Christmas card contender for me.


I also created this second card from the sketch.  Actually it probably mirrors the sketch more than the first card.  I took  and made my card base from ivory card stock.  I then added a green mat.  I had some designer holiday paper that was double sided.  I turned the ornament side over and found a two-toned red circle paper so I cut two strips of designer paper and one red.  I also made 3 buttons with acrylic caps and the paper I used for the strips.  I then placed the strips on the green mat and the buttons at the bottom of each strip.  I used the same Sparkle N Sprinkle Stamp Set 418 for the sentiment which I stamped on the ivory card stock in black and then backed it with red and mounted it on the bottom of the card. 

I like both cards.  I think they both turned out very well.  They were both easy to make and I completed them both quickly.  Since I sent out over 100 cards last year, I better get a move on. Decisions, decisions.

As a side note I have been told that some folks have not been able to "Join this Site"  If you are having difficuly drop me an email at pjselinski@comcast.net and I will add your name to the contest.  I checked this out today and it is working so I would have to address each problem individually.  Remember, the contest ends Friday, August 3 at 8pm CST.  I may have said Thursday on one post but it is Friday. 

Until Friday have a wonderful Thursday.

                                                   Pam 


www.sparklensprinkle.com if you are interested in the stamps and or Nestibilities.


Wednesday, August, 1, 2012

Well I am back to my newer Stampin Up sets.  Flower Fest is one that recently retired I think but I think it is a timeless set.  The flowers are frivolous and that is something we all can use from time to time.  I am really liking the Stampin Up new in-colors.  The Ripple Raspberry and Primrose Petals in particular.  I used the round scallop punch to complete the card and continue with the scalloped theme of the flowers.  I am off with my daughter, Katy, and grandson, Cohen, to visit Cohen's great-aunts, Roxanne and Marge. Enjoy the card and I hope you like it as much as I do


A trick I learned from Stampin Up demonstrator, Christine Miller, is to stamp the flower and then mask it before applying the leaves.  It leaves the impression that those leaves are under the flowers. 

Pam

Tuesday, July 31, 2012

Comments

Everyone who makes cards like comments.  In case you are not aware, after each post there is, in very tiny letters, the words 0 comments.  If you click on that it will bring you to a place where you can leave a comment about the post.  Good or bad I appreciate the comments.  It is a way that I can improve.  Thanks for checking my blog out and can't wait until Friday for the end of this contest.  Yes that is correct.  Periodically, I will be have contests of some sort.  I won't post them very far in advance so you have to check my site out often.  The prizes for this give away are just the tip of the ice berg, they will just be getting bigger and better. 


Pam

Monday, July 30, 2012

Tuesday, July 31, 2012

I have fallen in love with dies.  I have recently purchased some intricate dies from Cheery Lynn Designs.  I found a lattice die among all the intricate ones so decided to try this die out.  Wow it cuts great.  I didn't want to put to much else on the card so I just used a label punch and a small thank you but I couldn't resist the bling.  I love bling too and I must say this card is full of it.  I love it.  The colors were colors that were used at a recent wedding we attended.  Love these colors.  So without further ado here is the card.

I am so loving this card.  Thanks for looking.


Pam


Monday July 30, 2012

Hope your weekend was wonderful.  I have been making a lot of birthday cards and was going through some older ones that I have made in a class or on my own.  I found a card where we added beads and I know I made this in a class but cannot remember where or when.  Anyway, I decided I would add some beads to my birthday card.  First I found the designer paper I wanted to use.  It is from Echo Park Paper in a set called Country Drive.  Oh so cute.  Then I looked through my stashes of stuff and yes I have some beads.  Not a lot but some.  I found a couple of beads that matched the paper.  What are the odds.  The sentiments on the card are from long ago wooden stamps that have been converted to cling foam and I no longer know who made them.  The top sentiment was punched in white and then I used the same punch in red.  I cut the red in half and mounted to each side of the white.  Added a few flowers and miracles or miracles it turned out to be quite a cute card. 

Don't you just love those lady bugs.  I attached the beads through the flower and onto the back of the red card stock and adhered it with regular tape.  The black bead in the center of the other flower is just one that got away from a different project and I was tired of finding it in my way.  I hope you enjoy this card as much as I do.  Happy Monday everyone.

Pam

Sunday, July 29, 2012

Sunday, July 29, 2012


Hope everyone is have a fabulous weekend.  Ours have been very busy.  We went to a beautiful wedding on Saturday.  Today I went and seen my daughter, Jennifer's, new townhouse.  Wow it is really terrific.  I am always struggling with cards for men so I decided I would use Stampin Up's set called Up Up and Away.  I made two cards with the balloons.  I used blue backgrounds because afterall the sky is blue.  On the first card I couldn't help myself and used all but one of the balloons.  I used dimensionals on three of the 5 balloons.  I also used the clouds, birds and a the birthday sentiment on this card.

I have been trying to use up scraps and shapes that I have saved over time.  I found this scrap where I had cut out a dimensional and it left a frame of sorts.  After I trimmed it to size, I sponged pale blue ink, just a shade lighter than the card base, onto the frame.  I then centered the balloon basket onto the card base popped up the balloon and then adhered the frame to the card base.  I used Stampin Up new ink color, Midnight Muse for the sentiment and the birds that I placed on the frame.  I think it turned out nice and clean and really like it


 I guess I have found a wonderful set to use to make masculine birthday cards.  Although I think these cards could be used for women or kids.  It is just a versatile and very cute set.  Now I am not a Stampin Up demonstrator but I have a lot of there stamps and enjoy using them especially when they are as versatile as this set. 

If you haven't joined my site yet don't forget to do that so you have a chance to win a prize on Friday, August 3, 2012.

Friday, July 27, 2012

SNSS09 July Challenge

There is this wonderful site out there in computer land if you are looking for stamps or stamp supplies.  They have there own brand and some really wonderful stamps.  The company name is Sparkle N Sprinkle out of Florida.  I purchased a set of Christmas stamps from them along with the matching Nestibilities dies.  Well they also have monthly challenges and so I decided it was time to start thinking about that wonderful winter holiday we call Christmas and the stack of cards I want to make.  Well I came up with this card using the sketch that Sparkle and Sprinkle provided.  I love it.  This card came together so quickly, it is just right if you have a lot of cards to make.  First I found some holiday dp from my stash of gotta use this stuff up and then I used Versamark to stamp the image on red lettering weight paper.  I then took my Sakura clear star pen and sparkled up the ornament.  I then cut two ornaments with the Nestibilities dies. First was an ivory cut and the second was the red ornament.  I aged the ivory cut with a little pale yellow ink (it matched the dp) and attached that to the card with the dp on it.  I then used dimensionals and leaving just a small amount of the ivory cut showing, I attached the red ornament.  I love this card and it just might end up being my Christmas card this year. 

Thursday, July 26, 2012

Follower Giveaway

Well I know I sent out a note about following my blog.  I am trying to sign up followers and so I am going to hold a week long sign up contest.  All anyone has to do is "Join this site".  The contest will run from July 27, 2012 until 8:00pm (CST) on August 3, 2012.  I will be giving away two prizes at the end of the contest from all the followers that have joined my site.

Prize number one is in the picture below.  The mini moments are from Creative Memories and are a set of calendar pages.  These pages are blank so you can number and decorate them anyway you want.  Next is a stamp from Stampin Up that says remarkable.  Last is a Memory Box die called Elegant Scrollwork 

Prize number two will be a paper punch from Creative Memories that has 4 mini punches for Halloween and more Creative Memories papers.


Now the winners will be selected by an independent party; ie my hubby.  The winners name will be posted on this blog at 8:05 pm (CST) on August 3, 2012.  Winners will have until Monday at 8:00 p.m. (CST) August 6, 2012 to send me your information via email at pjselinski@comcast.net.

Check out my blog often for new card ideas and contests.  Also, every once in a while I plan on dropping in a phot of my favorite grandchildren.

One last thing, if there is anything that a card maker lovers it is comments about a card they have made.  I am very interested in hearing what you have to say about my cards.  Good or bad, I can always learn from your comments.  So please feel free and leave a comment in the comment section.
Pam

Wednesday, July 25, 2012

July 25, 2012

I am acting ditzy today.  I just lost everything and had to start all over.  I have been making cards like crazy.  Well actually our friends, Donna and Mark Sobraske, are helping host the wedding of their son, Eric to his fiancee, Bridget.  So I needed a card.  I made two.  The first one I used the colors in their wedding and got the idea from Pinterest.
Monogrammed towels, whatever happened to those?  Anyway I used Mr & Mrs. and the towel bar is made from a thin strip of silver cardstock and attached with silver brads.  I used Stampin Up Flourish embossing folder to make the towel.  It is a really cute card.


I have been wanting to try making a more elegant wedding card so I started to go crazy with my Spellbinders Nestibilities.  I used a Stampin Up stamp set called Word Play to stamp my sentiment. I do love bling so I played a small crystal on the ring in I do.  

  I am so excited to share this new product I found at a wonderful place called Sparkle N Sprinkle
They have an actual store in Florida but they also have an online store.  Anyway to the product.  It is called Mudd Puddles.  Sparkle N Sprinkle is the first place that I have seen this product.  I purchased the color called Fiji Beach.  It is a wet product that dries but has flexibility.  I just wanted to get going with it so I made a beach themed card. 

The beach is a teal and sand colored.  You spread it on the paper where you want it.  I just made a beach.  The Mudd Puddles dry in about an hour so you can work on the card.  It is completly dry in a day.  It really is what it says. It dries in the time it says and it is flexible so it won't come off.  I can see all kinds of beaches made with this stuff. It also comes in lots of different colors.  I can see using this for mosiacs.  I think I am going to try that next.  Well I want to buy a few more colors first.  I used a Stampin Up stamp for the sail boat and my favorite sea saying but don't know where that came from. I also used a stamp of a sand dollar that I have had forever.  I placed a pearl in the center of the sand dollar.  It is a little poetic license there but I wanted to link the sentiment to the shell.   Love the sentiment though and I have to say I  love the card and cannot wait to use Mudd Puddles again.